Yet More Change for the Capitals

Six years ago, I was pretty excited about the future for the Washington Capitals. They had just lost their first round match up with the Flyers – which was a bummer – but they had made the playoffs for the first time in 3 seasons. I wrote at the time:

Furthermore, even though they lost, these playoffs are a promise of future success. I tell my kids all the time that the only way to get good at something is to work hard while you’re bad at it. Playoff hockey is no different. Most of the Caps had little or no playoff experience going into this series and it really showed thru the first three games. But they kept at it and played much better over the last four games of the series. They went 2-2 in those games, but the two losses went to overtime. A little more luck (or better officiating) and the Caps are headed to Pittsburgh instead of the golf course.

What a difference six seasons makes. Sure, they won the President’s Trophy in 2010. But the promise of future playoff success has been broken, badly. The Caps have been on a pretty steep decline after getting beat by the eighth seed Canadians in the first round of the playoffs in 2010. Since then, they’ve switched systems three times and head coaches twice. This year, they missed the playoffs entirely even with Alex Ovechkin racking up a league-leading 51 goals.

Today, the word came down that both the coach and general manager have been let go. As a Caps fan, I’m really torn about this. I mean, I totally agree that the coach and GM had to go – frankly, I was surprised it didn’t happen 7-10 days earlier. But now what do you do? The draft is two months and one day away, free agency starts two days after that. The search for a GM is going to have to be fast. Then the GM will have to make some really important decisions about players at the draft, free agency and compliance buyouts with limited knowledge of the players in our system. Plus, he’ll need to hire a new head coach – preferably before the draft as well.

The one positive note is that the salary cap for the Capitals looks pretty good for next year. The Capitals currently have the second largest amount of cap space / open roster slot in the league. (The Islanders are first with $14.5 million / open roster slot. The Caps have just over $7 million / open roster slot.) They have only a handful of unrestricted free agents to resign – with arguably only one “must sign” (Mikhail Grabovski) in the bunch. Of course, this could also be a bug rather than a feature – having that many players under contract may make it harder for the new GM to shape the team in his image.

Who every the Capitals hire to be GM and coach, I’m not expecting a promising start. It feels like the next season is already a wash, and we’re not even finished with the first round of this year’s playoffs yet.

I guess it could be worse.

I could be a Toronto Leafs fan.

Brokered WinRT Components Step Three

So far, we’ve created two projects, written all of about two lines of code and we have both our brokered component and its proxy/stub ready to go. Now it’s time to build the Windows Runtime app that uses the component. So far, things have been pretty easy – the only really tricky and/or manual step so far has been registering the proxy/stub, and that’s only tricky if you don’t want to run VS as admin. Unfortunately, tying this all together in the app requires a few more manual steps.

But before we get to the manual steps, let’s create the WinRT client app. Again, we’re going to create a new project but this time we’re going to select “Blank App (Windows)” from the Visual C# -> Store Apps -> Windows App node of the Add New Project dialog. Note, I’m not using “Blank App (Universal)” or “Blank App (Windows Phone)” because the brokered WinRT component feature is not support on Windows Phone. Call the client app project whatever you like, I’m calling mine “HelloWorldBRT.Client”.

Before we start writing code, we need to reference the brokered component. We can’t reference the brokered component directly or it will load in the sandboxed app process. Instead, the app need to reference a reference assembly version of the .winmd that gets generated automatically by the proxy/stub project. Remember in the last step when I said Kieran Mockford is an MSBuild wizard? The proxy/stub template project includes a custom target that automatically publishes the reference assembly winmd file used by the client app. When he showed me that, I was stunned – as I said, the man is a wizard. This means all you need to do is right click on the References node of the WinRT Client app project and select Add Reference. In the Reference Manager dialog, add a reference to the proxy/stub project you created in step two.

Now I can add the following code to the top of my App.OnLaunched function. Since this is a simple Hello World walkthru, I’m not going to bother to build any UI. I’m just going to inspect variables in the debugger. Believe me, the less UI I write, the better for everyone involved. Note, I’ve also added the P/Invoke signatures for GetCurrentProcess/ThreadID and to the client app like I did in the brokered component in step one. This way, I can get the process and thread IDs for both the app and broker process and compare them.

var pid = GetCurrentProcessId();
var tid = GetCurrentThreadId();

var c = new HelloWorldBRT.Class();
var bpid = c.CurrentProcessId;
var btid = c.CurrentThreadId;

At this point the app will compile, but if I run it the app will throw a TypeLoadException when it tries to create an instance of HelloWorldBRT.Class. The type can’t be loaded because the we’re using the reference assembly .winmd published by the proxy/stub project – it has no implementation details, so it can’t load. In order to be able to load the type, we need to declare the HelloWorldBRT.Class as a brokered component in the app’s pacakge.appxmanifest file. For non-brokered components, Visual Studio does this for you automatically. For brokered components we have to do it manually unfortunately. Every activatable class (i.e. class you can construct via “new”) needs to be registered in the appx manifest this way.

To register HelloWorldBRT.Class, right click the Package.appxmanifest file in the client project, select “Open With” from the context menu and then select “XML (Text) editor” from the Open With dialog. Then you need to insert inProcessServer extension that includes an ActivatableClass element for each class you can activate (aka has a public constructor). Each ActivatableClass element contains an ActivatableClassAttribute element that contains a pointer to the folder where the brokered component is installed. Here’s what I added to Package.appxmainfest of my HelloWorldBRT.Client app.

<Extensions>
  <Extension Category="windows.activatableClass.inProcessServer">
    <InProcessServer>
      <Path>clrhost.dll</Path>
      <ActivatableClass ActivatableClassId="HelloWorldBRT.Class"
                        ThreadingModel="both">
        <ActivatableClassAttribute
             Name="DesktopApplicationPath"
             Type="string"
             Value="D:\dev\HelloWorldBRT\Debug\HelloWorldBRT.PS"/>
      </ActivatableClass>
    </InProcessServer>
  </Extension>
</Extensions>

The key thing here is the addition of the DesktopApplicationPath ActivatableClassAttribute. This tells the WinRT activation logic that HelloWorldBRT.Class is a brokered component and where the managed .winmd file with the implementation details is located on the device. Note, you can use multiple brokered components in your side loaded app, but they all have the same DesktopApplicationPath.

Speaking of DesktopApplicationPath, the path I’m using here is path the final location of the proxy/stub components generated by the compiler. Frankly, this isn’t an good choice to use in a production deployment. But for the purposes of this walk thru, it’ll be fine.

ClientWatchWindow

Now when we run the app, we can load a HelloWorldBRT.Class instance and access the properties. re definitely seeing a different app process IDs when comparing the result of calling GetCurrentProcessId directly in App.OnLoaded vs. the result of calling GetCurrentProcessId in the brokered component. Of course, each run of the app will have different ID values, but this proves that we are loading our brokered component into a different process from where our app code is running.

Now you’re ready to go build your own brokered components! Here’s hoping you’ll find more interesting uses for them than comparing the process IDs of the app and broker processes in the debugger! 😄

Brokered WinRT Components Step Two

Now that we have built the brokered component , we have to build a proxy/stub for it. Proxies and stubs are how WinRT method calls are marshalled across process boundaries. If you want to know more – or you have insomnia – feel free to read all the gory details up on MSDN.

Proxies and stubs look like they might be scary, but they’re actually trivial (at least in the brokered component scenario) because 100% of the code is generated for you. It couldn’t be much easier.

Right click the solution node and select Add -> New Project. Alternatively, you can select File -> New -> Project in the Visual Studio main menu, but if you do that make sure you change the default solution from “Create new Solution” to “Add to Solution”. Regardless of how you launch the new project wizard, search for “broker” again, but this time select the “Brokered Windows Runtime ProxyStub” template. Give the project a name – I chose “HelloWorldBRT.PS”.

ProxyStubAddReference

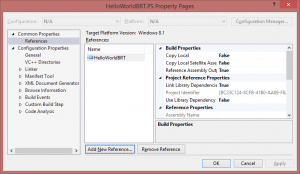
Once you’ve created the proxy/stub project, you need to set a reference to the brokered component you created in step 1. Since proxies and stubs are native, this is a VC++ project. Adding a reference in a VC++ is not as straightforward as it is in C# projects. Right click the proxy/stub project, select “Properties” and then select Common Properties -> References from the tree on the left. Press the “Add New Reference…” button to bring up the same Add Reference dialog you’ve seen in managed code projects. Select the brokered component project and press OK.

Remember when I said that 100% of the code for the proxy/stub is generated? I wasn’t kidding – creating the template and setting referencing the brokered component project is literally all you need to do. Want proof? Go ahead and build now. If you watch the output windows, you’ll see a bunch of output go by referencing IDL files and MIDLRT among other stuff. This proxy/stub template has some custom MSBuild tasks that generates the proxy/stub code using winmdidl and midlrt. The process is similar to what is described here. BTW, if you get a chance, check out the proxy/stub project file – it is a work of art. Major props to Kieran Mockford for his msbuild wizardry.

ProxyStubRegisterOutput

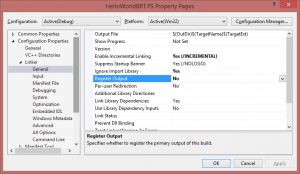
Unfortunately, it’s not enough just to build the proxy/stub – you also have to register it. The brokered component proxy/stub needs to be registered globally on the machine, which means you have to be running as an admin to do it. VS can register the proxy/stub for you automatically, but that means you have to run VS as an administrator. That always makes me nervous, but if you’re OK with running as admin you can enable proxy/stub registration by right clicking the proxy/stub project file, selecting Properties, navigating to Configuration properties -> Linker -> General in the tree of the project properties page, and then changing Register Output to “Yes”.

If you don’t like running VS as admin, you can manually register the proxy/stub by running regsvr32 <proxystub dll> from an elevated command prompt. Note, you do have to re-register every time the public surface area of your brokered component changes so letting VS handle registration admin is definitely the easier route to go.

In the third and final step, we’ll build a client app that accesses our brokered component.

Brokered WinRT Components Step One

In this step, we’ll build the brokered component itself. Frankly, the only thing that makes a brokered component different than a normal WinRT component is some small tweaks to the project file to enable access to the full .NET Runtime and Base Class Library. The brokered component whitepaper describes the these tweaks in detail, but the new brokered component template takes care of these small tweaks for you.

BRT_NewProject

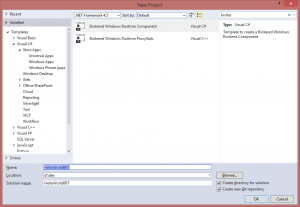
Start by selecting File -> New -> Project in Visual Studio. With the sheer number of templates to choose from these days, I find it’s easier to just search for the one I want. Type “broker” in the search box in the upper left, you’ll end up with two choices – the brokered WinRT component and the brokered WinRT proxy/stub. For now, choose the brokered component. We’ll be adding a brokered proxy/stub in step two. Name the project whatever you want. I named mine “HelloWorldBRT”.

This is probably the easiest step of the three as there’s nothing really special you have to do – just write managed code like you always do. In my keynote demo, this is where I wrote the code that wrapped the existing ADO.NET based data access library. For the purposes of this walkthrough, let’s do something simpler. We’ll use P/Invoke to retrieve the current process and thread IDs. These Win32 APIs are supported for developing WinRT apps and will make it obvious that the component is running in a separate process than the app. Here’s the simple code to retrieve those IDs (hat tip to pinvoke.net for the interop signatures):

public sealed class Class
{
    [DllImport("kernel32.dll")]
    static extern uint GetCurrentThreadId();

    [DllImport("kernel32.dll")]
    static extern uint GetCurrentProcessId();

    public uint CurrentThreadId
    {
        get { return GetCurrentThreadId(); }
    }

    public uint CurrentProcessId
    {
        get { return GetCurrentProcessId(); }
    }
}

That’s it! I didn’t even bother to change the class name for this simple sample.

Now, to be clear, there’s no reason why this code needs to run in a broker process. As I pointed out, the Win32 functions I’m wrapping here are supported for use in Windows Store apps. For this walkthrough, I’m trying to keep the code simple in order to focus on the specifics of building brokered components. If you want to see an example that actually leverages the fact that it’s running outside of the App Container, check out the NorthwindRT sample.

In the next step, we’ll add the proxy/stub that enables this component to communicate across a process boundary.

Brokered WinRT Components Step-by-Step

Based on the feedback I’ve gotten since my keynote appearance @ Build – both in person and via email & twitter – there are a lot of folks who are excited about the Brokered WinRT Component feature. However, I’ve been advising folks to hold off a bit until the new VS templates were ready. Frankly, the developer experience for this feature is a bit rough and the VS template makes the experience much better. Well, hold off no longer! My old team has published the Brokered WinRT Component Project Templates up on the Visual Studio Gallery!

Now that the template is available, I’ve written a step-by-step guide demonstrating how to build a “Hello World” style brokered component. Hopefully, this will help folks in the community take advantage of this cool new feature in Windows 8.1 Update.

To keep it readable, I’ve broken it into three separate posts:

Note, this walkthrough assumes you’re running Windows 8.1 Update, Visual Studio 2013 with Update 2 RC (or later) and the Brokered WinRT Component Project Templates installed.

I hope this series helps you take advantage of brokered WinRT components. If you have any further questions, feel free to drop me an email or hit me up on Twitter.