So far, we’ve created two projects, written all of about two lines of code and we have both our brokered component and its proxy/stub ready to go. Now it’s time to build the Windows Runtime app that uses the component. So far, things have been pretty easy – the only really tricky and/or manual step so far has been registering the proxy/stub, and that’s only tricky if you don’t want to run VS as admin. Unfortunately, tying this all together in the app requires a few more manual steps.
But before we get to the manual steps, let’s create the WinRT client app. Again, we’re going to create a new project but this time we’re going to select “Blank App (Windows)” from the Visual C# -> Store Apps -> Windows App node of the Add New Project dialog. Note, I’m not using “Blank App (Universal)” or “Blank App (Windows Phone)” because the brokered WinRT component feature is not support on Windows Phone. Call the client app project whatever you like, I’m calling mine “HelloWorldBRT.Client”.
Before we start writing code, we need to reference the brokered component. We can’t reference the brokered component directly or it will load in the sandboxed app process. Instead, the app need to reference a reference assembly version of the .winmd that gets generated automatically by the proxy/stub project. Remember in the last step when I said Kieran Mockford is an MSBuild wizard? The proxy/stub template project includes a custom target that automatically publishes the reference assembly winmd file used by the client app. When he showed me that, I was stunned – as I said, the man is a wizard. This means all you need to do is right click on the References node of the WinRT Client app project and select Add Reference. In the Reference Manager dialog, add a reference to the proxy/stub project you created in step two.
Now I can add the following code to the top of my App.OnLaunched function. Since this is a simple Hello World walkthru, I’m not going to bother to build any UI. I’m just going to inspect variables in the debugger. Believe me, the less UI I write, the better for everyone involved. Note, I’ve also added the P/Invoke signatures for GetCurrentProcess/ThreadID and to the client app like I did in the brokered component in step one. This way, I can get the process and thread IDs for both the app and broker process and compare them.
var pid = GetCurrentProcessId();
var tid = GetCurrentThreadId();

var c = new HelloWorldBRT.Class();
var bpid = c.CurrentProcessId;
var btid = c.CurrentThreadId;
At this point the app will compile, but if I run it the app will throw a TypeLoadException when it tries to create an instance of HelloWorldBRT.Class. The type can’t be loaded because the we’re using the reference assembly .winmd published by the proxy/stub project – it has no implementation details, so it can’t load. In order to be able to load the type, we need to declare the HelloWorldBRT.Class as a brokered component in the app’s pacakge.appxmanifest file. For non-brokered components, Visual Studio does this for you automatically. For brokered components we have to do it manually unfortunately. Every activatable class (i.e. class you can construct via “new”) needs to be registered in the appx manifest this way.
To register HelloWorldBRT.Class, right click the Package.appxmanifest file in the client project, select “Open With” from the context menu and then select “XML (Text) editor” from the Open With dialog. Then you need to insert inProcessServer extension that includes an ActivatableClass element for each class you can activate (aka has a public constructor). Each ActivatableClass element contains an ActivatableClassAttribute element that contains a pointer to the folder where the brokered component is installed. Here’s what I added to Package.appxmainfest of my HelloWorldBRT.Client app.
<Extensions>
  <Extension Category="windows.activatableClass.inProcessServer">
    <InProcessServer>
      <Path>clrhost.dll</Path>
      <ActivatableClass ActivatableClassId="HelloWorldBRT.Class"
                        ThreadingModel="both">
        <ActivatableClassAttribute
             Name="DesktopApplicationPath"
             Type="string"
             Value="D:\dev\HelloWorldBRT\Debug\HelloWorldBRT.PS"/>
      </ActivatableClass>
    </InProcessServer>
  </Extension>
</Extensions>
The key thing here is the addition of the DesktopApplicationPath ActivatableClassAttribute. This tells the WinRT activation logic that HelloWorldBRT.Class is a brokered component and where the managed .winmd file with the implementation details is located on the device. Note, you can use multiple brokered components in your side loaded app, but they all have the same DesktopApplicationPath.
Speaking of DesktopApplicationPath, the path I’m using here is path the final location of the proxy/stub components generated by the compiler. Frankly, this isn’t an good choice to use in a production deployment. But for the purposes of this walk thru, it’ll be fine.
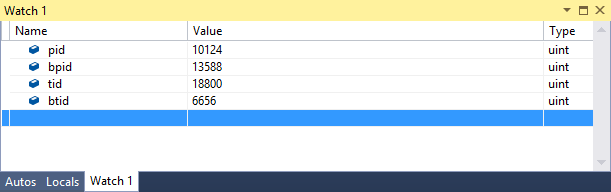
Now when we run the app, we can load a HelloWorldBRT.Class instance and access the properties. re definitely seeing a different app process IDs when comparing the result of calling GetCurrentProcessId directly in App.OnLoaded vs. the result of calling GetCurrentProcessId in the brokered component. Of course, each run of the app will have different ID values, but this proves that we are loading our brokered component into a different process from where our app code is running.
Now you’re ready to go build your own brokered components! Here’s hoping you’ll find more interesting uses for them than comparing the process IDs of the app and broker processes in the debugger! 😄