Ambiguous ExtensionAttribute Errors

I was recently contacted by Nathanael Jones of the ImageResizer project about a question he had posted on Stack Overflow:

How can a single .NET assembly, targeting 2.0, 3.0, 3.5, 4.0, and 4.5 concurrently, support extension methods for both C# and VB.NET consumers?

Short Answer: You can’t. You think you can, but if you’re serious about targeting .NET 2.0/3.0 and 3.5+ as well as that whole C# and VB support thing, you can’t. Not really.

Long Answer: People love extension methods. Seriously, I think some people want to marry extension methods they love them so much. They just can’t stand to be without their extension methods, even when they’re using .NET 2.0.

Rather than go without, some people figured out how to get extension methods support on older versions of the .NET Runtime. Extension methods are essentially a compile time technology – the IL that gets emitted for calling an extension method is identical to the IL for calling a normal static method. The only runtime dependency for extension methods is the ExtensionAttribute which is used to mark methods intended to be used as extension methods (as well as classes and assemblies that contain them). ExtensionAttribute is defined in System.Core from .NET 3.5, but it’s just a marker. If you define your own copy of ExtensionAttribute and use the VS 2008 or later version of the C# compiler, you can get extension methods to work on .NET 2.0.

Back when I was working on IronPython, we ran into this exact issue when we merged DLR expression trees with LINQ expression trees. LINQ trees used extension methods all over the place, but we still needed to support .NET 2.0 in IronPython. We were already using the VS08 compiler so all we had to do was add our own copy of ExtensionAttribute to the DLR and we were good to go…or so we thought. Instead, we discovered that this approach doesn’t work as advertised – at least not if you care about VB support.

The problem stems from having multiple copies of ExtensionAttribute. IronPython and DLR had no problem – they were compiled for .NET 2.0 and thus had only the one copy of ExtensionAttribute that we added to the DLR. But people who used IronPython or DLR in a .NET 3.5 project ended up two copies of ExtensionAttribute – the copy we added to DLR and the official System.Core version. Two copies of a system provided type == start of a big problem.

Actually, if you’re only using C#, having multiple copies of ExtensionAttribute isn’t that big a deal. The C# compiler raises a warning when it find multiple definitions of a type in the System namespace. Because ExtensionAttribute is in the System namespace, C# has to pick one of the colliding type definitions to use. However, since the copies of ExtensionAttribute are identical it doesn’t matter which version the C# compiler picks.

Unfortunately, Visual Basic is much less forgiving when it encounters multiple versions of the same type. Instead of a warning like C#, the VB compiler raises an error when it encounters multiple definitions of ExtensionAttribute. So the “define your own ExtensionAttribute” approach leaves you with a DLL that won’t work from VB on .NET 3.5 or later.

Excluding VB on what was the most recent version of .NET at the time was a non starter for us, so we investigated other options. We discovered that we could “solve” this issue (again “or so we thought”) by having an internal definition of ExtensionAttribute in every assembly that needed it. Since the types weren’t public, VB stopped complaining about type collisions. C# still had the compiler warning, but we had already decided not to care about that.

I said at the time “It seems counterintuitive, doesn’t it? To solve a multiple type definition problem, we defined even more copies of the type in question.” Yeah, turns out I was kinda way wrong about that. We discovered later that having an internal ExtensionAttribute per project solved the VB ambiguous type error but introduced a new “break all the other extension methods in the project error”.

Remember earlier when I wrote it didn’t matter which copy of ExtensionAttribute the C# compiler picks because they are “identical”? Remember when I wrote we could solve the VB ambiguous type error by changing the visibility of ExtensionAttribute? Woops. Changing the visibility of our ExtensionAttribute meant it was no longer identical which meant it kinda mattered which copy of ExtensionAttribute the C# compiler choose. If the C# compiler picked one of our internal ExtensionAttributes, it would break every use of extension methods in the project referencing IronPython or the DLR!

We investigated a bunch of ways to control which version of ExtensionAttribute was selected by the C# compiler, but we couldn’t find an easy, obvious way in MSBuild to control the order of references passed to the compiler. In the end, we moved the custom ExtensionAttribute into its own DLL. That way, we could reference it from our IronPython and DLR projects to get extension method support but .NET 3.5 projects referencing either IronPython or DLR could reference System.Core instead. We still got the C# warning, but since we were back to identical ExtensionAttribute  definitions, the warning could be ignored.

Believe me, if there had been any way to remove the extension methods from the DLR and IronPython, we would have done it. Having a separate assembly with just a single custom attribute definition is an ugly hack, pure and simple. But the DLR was essentially the .NET 4.0 version System.Core – getting it to run along side the .NET 3.5 version of System.Core was bound to require hacks.

My advice to Nathanial on SO was the same as I gave at the top of this post: don’t use the “define your own ExtensionAttribute” hack to try and get extension method support on .NET 2.0. Extensions methods are nice, but they aren’t worth the headache of dealing with the errors that stem from multiple definitions of ExtensionAttribute when you try to use your library from .NET 3.5 or later.
Windows Camp Demo, Part One

Several weeks ago, I did a talk on building Windows Runtime components in C++. As part of that talk, I did a demo that showed accessing a WinRT component written in C++ from a C# XAML application. Like I did for my //build talk, I’ve written this walkthrough so you can follow along at home without having to read code off the recorded video stream. I’ve also published the source up on GitHub.

The demo had two parts – the first was a “Hello, world!” style demo, the second demonstrated wrapping an existing C++ library in a WinRT component to make it callable from other languages. This post covers the first part of the demo. I’ll post a walkthrough of the second part of the demo soon.

In order to follow along, you’ll need the Windows 8 Release Preview as well as Visual Studio 2012 Express RC for Windows 8. You should be able to use the RC version of VS 2012 Pro, Premium or Ultimate, but I’ve only tested with Express. Note, the original presentation was done on Win8 Consumer Preview / VS 11 Beta, but I figured it made more sense to write up the walkthrough on the latest bits.

We’re going to start by creating the C# XAML app we’ll use as the component client. Fire up VS 2012 RC and select new project. Select Visual C# -> Windows Metro Style -> Blank App (XAML), name the project “WindowsCamp” and press OK. Once the project has been created, open up the MainPage.xaml file, replace the Grid element that’s there by default with the following XAML code:

<StackPanel Background="{StaticResource ApplicationPageBackgroundThemeBrush}">
    <Button Click="Button_Click_1">Click me</Button>
    <TextBlock x:Name="myText" FontSize="20"></TextBlock>
    <Image x:Name="myImage"></Image>
</StackPanel>

As you can see, my UX skills have not improved since //build.

Now, we need to add a project for the C++ WinRT component. Right click on solution in the Solution Explorer and select Add -> New Project. In the New Project dialog, Select Visual C++ -> Windows Metro Style -> Windows Runtime Component, name the project “WindowsCampComponent” and press OK.

Once the component project has been created, we’re going to add some code to it. Open Class1.h if it’s not already open. Update the file to read as follows:

#pragma once

using namespace Platform;

namespace WindowsCampComponent
{
    public ref class Class1 sealed
    {
    public:
        Class1();

        String^ SayHello(String^ name) {
            return String::Concat(
                ref new String(L"Hello there "),
                name);
        };
    };
}

The code is a bit more complex than your typical Hello, world. The SayHello method takes a string parameter that represents someone’s name. The method concatenates the provided name with a hard coded greeting string and returns the resulting string. Doesn’t get much simpler. However, even though it’s just a single line of code there are several concepts that are important to point out:

  • ref class – WinRT objects are projected in C++/CX as ref classes and vise-versa. Since we’re building a WinRT component to consume from C#, we define it as a ref class. Note, unless you’re writing a XAML control, all WinRT classes must be sealed.
  • Hats – The ‘^’ character after the String type declarations is the handle-to-object modifier. It’s basically the pointer-to-object modifier (aka ‘*’) but for ref classes. We’ll see in the second part of the demo that you invoke members on a ref class using the same ‘->’ syntax that you use in vanilla C++.
  • ref new – You create instances of ref clases using “ref new” instead of “new” as you do in vanilla C++. Ref new returns a handle to the newly created ref class – a String^ in this case.
  • PlatformString – C++/CX projects some non-class WinRT types as ref classes in the Platform namespace. In this case, C++/CX projects the new language interoperable string type HSTRING as a PlatformString ref class. HSTRINGS are UTF-16, so PlatformString provides a constructor that takes a wide string literal. We imported the Platform namespace via the “using namespace” directive so we wouldn’t have to type “Platform” multiple times.

For more information about the design of the C++/CX language, check out Jim Springfield’s post on the Visual C++ team blog.

Now that we’ve written our WinRT component, we’ll write the code to consume it in C#. First, we need to add a reference to the C++ WinRT component project in our C# Metro style XAML app. WinRT references are added just like traditional CLR references – via the Add Reference dialog. Right click on the WindowsCamp node of the Solution explorer, select “Add Reference…” from the menu, click the check box next to the WindowsCampComponent project from the solution and press OK.

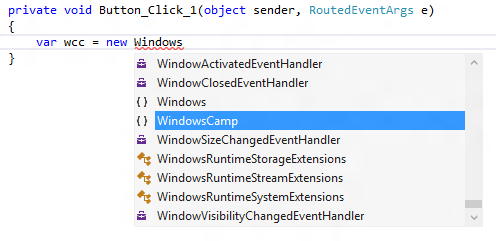
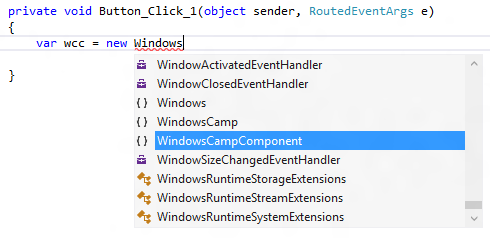
Go back to MainPage.xaml and double click on the button labeled “Click Me” in the designer. This will add a click event handler named Button_Click_1 and take you to MainPage.xaml.cs so you can write the code for it. Type in “var wcc = new Windows” and look at the resulting intellisense list. Notice that WindowsCampComponent is missing.

This is because the C++ component hasn’t been compiled yet. We need compile the C++ component project in order to generate the Windows metadata file (aka the file with the .winmd extension) that is used to drive intellisense. Delete the line of code you just added and compile the solution. Now type that line of code again, and you’ll notice that the WindowsCampComponent namespace is available.

Now, update the button click event handler to read as follows:

private void Button_Click_1(object sender, RoutedEventArgs e)
{
    var wcc = new WindowsCampComponent.Class1();
    myText.Text = wcc.SayHello("Herb Sutter");
}

Now, run the app, click the “Click Me” button and marvel at the wonder of WinRT language interop to print a greeting to Herb Sutter. I used Herb Sutter from the C++ team since he was the keynote speaker at the Windows Camp event and was standing in the back of the room when I did the demo.

And that’s it for the Hello, world demo. Kind of a lot of steps for essentially 3 lines of code – 1 line of component code and 2 lines of client code. However, we did get the infrastructure set up so we add more substantial code in the next post.

Building WinRT Components with C++/CX

I don’t get out to talk to customers like I used to in previous jobs. <sigh> But a few weeks ago, I got a chance to do a session at Channel 9′s Developing Windows 8 Metro style apps with C++ Windows Camp. There were some great talks at the event on XAML with C++, C++ for Metro Style Games and using DirectX and XAML together. My talk was on building Windows Runtime Components in C++. Here’s the abstract:

The Windows Runtime enables developers from a variety of languages – JavaScript, C#, Visual Basic and C++ – to use the Windows APIs in a natural and familiar way. But did you know that you can build your own components that project into those same languages for use in your Metro style apps? Watch this session to learn how to build your own Windows Runtime components with C++ that can be used across languages in Metro style applications.

I haven’t had time, but I plan to blog the demo step-by-step like I did for my //build demo. In the meantime, check out the talk:

(Note, the static image below appears cut-off, but the video should scale to the width of my blog automatically. If not, head on over to the official page for the talk over on Channel 9)

My //build Talk

I just realized that while I posted the demo steps from my //build talk, I never posted the talk itself here on DevHawk. Consider that oversight rectified with this post.

(Note, the static image below appears cut-off, but the video should scale to the width of my blog automatically. If not, head on over to the official page for the talk over on Channel 9)

Using WinRT from C# //build Demo

Yesterday at//build, Jesse Kaplan and I delivered the Using Windows Runtime from C# and Visual Basic talk. In the talk, I demonstrated how natural and familiar it is to use WinRT from C# by building a simple Metro style app. This app  takes a picture with a webcam and implements the share charm contract in less than 15 lines of C# code.

Instead of making you try and read code off the recorded video stream that should be published soon, I’ve written this walkthru to explain exactly what I did in that demo. In addition, I’ve started from scratch (i.e. File->New Project) so that you can follow along at home if you wish.

First, you need to install the Windows Developer Preview. I recommend the x64 version with tools. Scott Hanselman has a great write up on using boot to VHD to run the preview. (though I do disagree w/ his assessment of dual boot. I’ve been dual booting Win7 and Win8 on my laptop for months and it’s never ended in tears or blood). Also, you’re going to need a webcam in order to run the app yourself.

Once the Windows Developer Preview is up and running, run the Socialite app and login with your Facebook credentials. We’re going to use Socialite to share the picture we take with the webcam. Giving it your credentials up front makes the demo run smoother!

Next, fire up VS11 (aka Microsoft Visual Studio 11 Express for Windows Developer Preview). Create a new project and select the Visual C# -> Windows Metro Style -> Application template.

Once the new project has been created, you should be looking at the MainPage.xaml file. Update the Grid element to contain a button and an image.

<Grid x:Name="LayoutRoot" Background="#FF0C0C0C">
    <Button x:Name="ClickMe" Click="ClickMe_Click">Click Me</Button>
    <Image x:Name="Photo" Width="800" Height="600"
           HorizontalAlignment="Center" VerticalAlignment="Center"/>
</Grid>

Next, hover over the Click=”ClickMe_Click” attribute of the button, right click and select “Navigate to Event Handler”. VS11 will take you to MainPage.xaml.cs and automatically generate a skeleton event handler for you.

In my //build session, I demonstrated that VS11 can automatically resolve WinRT namespaces the same way that it resolves managed namespaces. But for the purposes of this blog post, it’s easier if you just add the additional using statements we’re going to need at the top of MainPage.xaml.cs now.

using Windows.Media.Capture;
using Windows.Storage;
using Windows.UI.Xaml.Media.Imaging;
using Windows.ApplicationModel.DataTransfer;
using Windows.Storage.Streams;

Now, we add the code for ClickMe_Click:

private async void ClickMe_Click(object sender, RoutedEventArgs e)
{
    var ui = new CameraCaptureUI();
    ui.PhotoSettings.CroppedAspectRatio = new Size(4, 3);

    var file = await ui.CaptureFileAsync(CameraCaptureUIMode.Photo);

    if (file != null)
    {
        var stream = await file.OpenAsync(FileAccessMode.Read);

        var bitmap = new BitmapImage();
        bitmap.SetSource(stream);
        Photo.Source = bitmap;
    }
}

A few things to note about this code:

  • Even though it’s using native WinRT libraries, the C# feels natural and familiar – as if you were calling into traditional managed libraries. We’re newing up classes, we’re passing in constructor parameters, we’re using primitive numbers and enums, we’re assigning properties, etc. That is very much by design.
  • We’re using a couple of async WinRT methods (CaptureFileAsync and OpenAsync). C# 5.0′s new await keyword to make it extremely easy to write linear looking code that doesn’t block on async operations.
  • No P/Invoke or COM Interop attributes anywhere to be seen!

Finally, before we can run this code we need to declare our intent to use the webcam. Double click on the Package.appxmanifest file, click on the “Capabilites” tab, and then check the Webcam checkbox.

With the capability declared, now we can run the app. Hit F5 and VS11 will compile and deploy the Metro style app you just built. Click the button, acknowledge that you want to let the program use the webcam, take a pic, crop it, and there it is in your UI!

For the second part of the demo, I added share contract support. Here’s how to do that.

First, we need to pull the stream variable into class instance scope so that we can access it in the share contract event handler. We do that by adding a private IRandomAccessStream variable named stream and removing the var declarations from the line where we call OpenAsync. The updated click event handler looks like this:

//here's the instance scope stream variable
IRandomAccessStream stream;

private async void ClickMe_Click(object sender, RoutedEventArgs e)
{
    var ui = new CameraCaptureUI();
    ui.PhotoSettings.CroppedAspectRatio = new Size(4, 3);

    var file = await ui.CaptureFileAsync(CameraCaptureUIMode.Photo);

    if (file != null)
    {
        //the only change from the code above was to remove
        //the var declaration from the following line
        stream = await file.OpenAsync(FileAccessMode.Read);

        var bitmap = new BitmapImage();
        bitmap.SetSource(stream);
        Photo.Source = bitmap;
    }
}

Next, we need to wire up the share event handler in the XAML page’s constructor. That’s a single line of code and VS11 intellisense writes most of  it for you

public MainPage()
{
    InitializeComponent();
    DataTransferManager.GetForCurrentView().DataRequested +=
        new TypedEventHandler<DataTransferManager, DataRequestedEventArgs>(MainPage_DataRequested);
}

If you’ve ever wired up an event handler in C# before with VS, you’ll be familiar with the “Press TAB to insert” the correct event handler type followed by “TAB to generate handler”. Even though hthis is a WinRT event, VS11 helps you wire it up just the same as it does for managed events.

Now we implement the share contract event handler. That’s just a simple if statement – calling args.Request.Data.SetBitmap if the user has taken a picture and calling args.Request.FailWithDisplayText with an error message if they have not.

private void MainPage_DataRequested(DataTransferManager sender,
    DataRequestedEventArgs args)
{
    if (stream == null)
        args.Request.FailWithDisplayText("No picture taken!");
    else
        args.Request.Data.SetBitmap(stream);
}

This part of the demo shows off static methods and event handlers. Again, note how natural and familiar it feels to use WinRT from C#.

And we’re done, so hit F5 to build, deploy and run the app again.

I didn’t remember to do this in the //build talk, but first try selecting the share contract before taking a picture. Windows will display the “No picture taken” text in share contract window since the user taken a picture to share yet. That’s pretty boring so dismiss the share contract and take a picture like you did before. Then select the share contract, select Socalite, write a pithy message and press “Share in Facebook”.

That’s the entire demo! Taking a picture with the webcam, uploading to facebook, calling native WinRT APIs from C# in a natural and familiar way and all in just under 15 lines of code!

With our talk and demos, Jesse and I wanted to communicate just how important C# and VB are in the overall developer story for Windows 8. This demo shows off the hard work our two teams have done in order to make sure the managed developer’s experience with Windows 8 was the best that it could be. As I said in the talk – if you’re a managed developer, you already know how to build these Metro style apps.

I know I said it before, but I really can’t wait to see what you guys build with Windows 8!