Windows Camp Demo, Part Two

In my previous post, we set up a C++ WinRT component project and a C# Metro style XAML app to use the component. The code was dinky Hello, world type stuff. Now, let’s do something a little more interesting.

In preparing for this demo, I found a C++ bitmap library on CodePlex that includes a plasma texture generation function. This sounded like a good demo for both language interop and using existing code. It builds on the code from my previous post, so either start there or clone from GitHub and checkout the part1 tag.

First step is to add the bitmap_image.hpp file from Arash Partow’s C++ Bitmap Library to the C++ component project. Download the latest commit from CodePlex as a zip and extract the bitmap_image.hpp file into your C++ component project directory. Switch over to VS, right click on the component project node, select Add -> Existing Item… and select the bitmap_image.hpp file.

Now that we have included the library code, we need to write the wrapper code to expose that library functionality to other languages via WinRT. We’ll start by adding the following namespace declarations to the top of the Class1.h header file:

using namespace Windows::Foundation;
using namespace Windows::Storage::Streams;

And then we’ll add the declaration for our GetPlasmaImageAsync method to Class1’s header file underneath the SayHello method. Note, in my original presentation I called this method GetPlasmaImage, neglecting to follow the naming convention of appending “Async” to name of all asynchronous methods.

IAsyncOperation<IRandomAccessStream^>^ GetPlasmaImageAsync(
    unsigned int width, unsigned int height);

We’re using two WinRT types in this method declaration.

  • IRandomAccessStream represents a stream of binary data that supports random access. We’re going to return our plasma image as an IRandomAccessStream and then wrap it in a XAML bitmap image for use in our UI.
  • IAsyncOperation<T> represents an asynchronous operation that returns a value. Generating the image takes a significant amount of time (especially given the shortcut I used as you’ll see in a bit) so we need to make it async. Async is a big topic and we’re just touching on it in this walkthrough. For more on async in WinRT, check out my teammate Jason Olson’s post on the Win8 app developer blog.

Now that we have the declaration, let’s switch over to the Class1.cpp file to add the method implementation. This isn’t a one line method like SayHello, so I decided to separate declaration from implementation as is traditional C++ best practice.

Before we do anything else, we need to #include the bitmap_image.hpp file. However, this bitmap library uses an unchecked destination STL copy function that Microsoft considers unsafe. I really should be updating the code to used checked iterators, but since this is demo code, we’re going to turn off the warning instead. We do that by #defining _SCL_SECURE_NO_WARNINGS. While we’re doing that, let’s add the additional #includes and using namespace statements we’re going to need.

#include "pch.h"
#include "Class1.h"

#define _SCL_SECURE_NO_WARNINGS
#include "bitmap_image.hpp"
#include <string>
#include <ppltasks.h>

using namespace WindowsCampComponent;
using namespace std;
using namespace concurrency;
using namespace Windows::Storage;

In addition to the bitmap image library, we’re going to need the STL string library and the Parallel Patterns Library, so I’ve gone ahead and #included those header files and used those namespaces. We’re also going to use some types from the Windows::Storage namespace, so I’ve used that namespace as well.

The implementation of the GetPlasmaImageAsync method is going to happen in several steps:

  1. Generate the plasma image using the C++ Bitmap library
  2. Save the plasma image to a temporary file
  3. Reopen the temporary file as an IRandomAcessStream with WinRT’s file system APIs

Saving and reopening the file is the shortcut I alluded to earlier. The image library includes a save_image method that uses STL streams to write the image out to a file. A better solution would be to factor the save_image method to support saving a bitmap to a stream and then implementing an STL -> WinRT stream adapter, but this is a simple demo so I’ll leave that as an exercise to the reader. (Please send me a pull request if you do this!)

First, we’re going to generate the file path we’ll be saving the image to. Turns out this somewhat difficult because WinRT uses wide character strings while the bitmap library expects ASCII STL strings.

//get the temp filename
auto tempFolder = ApplicationData::Current->TemporaryFolder;

wstring tempFolderPath(tempFolder->Path->Data());
string folderPath(begin(tempFolderPath), end(tempFolderPath));

auto filePath = folderPath.append("\\plasma.bmp");

I’m not proud of this code. It’s the kind of code you write when you’re rushing to get a demo for your talk done. But lets look at it anyway.

First, I get the path to the temporary folder via the current ApplicationData object. Then I converted it first to a stdwstring and then to a stdstring. I probably could have created the std::string directly from the tempFolder variable, but using the begin and end iterators of the wstring is a clever hack I read somewhere online. Finally, I append the file name to the folder path to get the final file path name.

Next, we generate and save the plasma image. This code is lifted almost verbatim from the bitmap_test.cpp file that comes with the C++ image library. The only difference is that we’re using the width and height arguments as parameters to the bitmap_image constructor rather than hardcoded values.

//create the image object
bitmap_image image(width, height);
image.clear();

double c1 = 0.9;
double c2 = 0.5;
double c3 = 0.3;
double c4 = 0.7;

::srand(0xA5AA5AA5);

//generate plasma image
plasma(image, 0, 0, image.width(), image.height(),
    c1, c2, c3, c4, 3.0, jet_colormap);

//Save the image to the file
image.save_image(filePath);

Finally, we open the image file from the temporary folder using WinRT APIs. File access APIs in WinRT are exclusively async, so I’m using PPL tasks to simplify the async code. Note, I’ve reworked this code from what I did in the video to make it easier to understand. I’ve also added explicit type declarations that I didn’t need to make it clear what each type is. If I replaced those all with the new auto keyword from C++11, the code would work the same.

//reopen the image file using WinRT
IAsyncOperation<StorageFile^>^ getFileAsyncOp =
    tempFolder->GetFileAsync(ref new String(L"plasma.bmp"));

task<StorageFile^> getFileTask(getFileAsyncOp);

task<IRandomAccessStream^> openFileTask =
    getFileTask.then([](StorageFile^ storageFile) {
       return storageFile->OpenAsync(FileAccessMode::Read);
    });

return create_async(
    [openFileTask]() { return openFileTask; });

First, we call GetFileAsync to get the file from the temp folder which returns an IAsyncOperation<StorageFolder^> object. We then convert the IAsyncOperation to a PPL task via the task constructor. Note, these two steps could be easily combined into a single step if you not being extra verbose for education purposes.

Once we have a PPL task to get the file, we specify the operation to do when the task completes by passing a lambda to the task’s then method. In this case, we’re going to open the file after we get it. The then method is nice because we can chain together as many async operations as we want in a nearly-synchronous coding style.

Finally, once we have built up the PPL task that represents the entire asynchronous operation, we use the create_async method to convert the PPL task back to an IAsyncOperation which we return from the function.

Now that we have written the component side, lets update the client side. Async operations are very succinct in CLR because of the new await keywords. Much nicer than the .then model used by PPL (which is probably why Herb Sutter wants to see await added to C++).

private async void Button_Click_1(object sender, RoutedEventArgs e)
{
    var wcc = new WindowsCampComponent.Class1();
    myText.Text = wcc.SayHello("Herb Sutter");

    var stm = await wcc.GetPlasmaImageAsync(800, 600);

    var bitmap = new BitmapImage();
    bitmap.SetSource(stm);
    myImage.Source = bitmap;
}

And it works!

And that’s the entire demo. About 20 lines of code to wrap a pre-existing library function and make it available to other languages via the Windows Runtime. I showed calling my WinRT component from C# here, but I could have called it from JavaScript just as easily.

Ambiguous ExtensionAttribute Errors

I was recently contacted by Nathanael Jones of the ImageResizer project about a question he had posted on Stack Overflow:

How can a single .NET assembly, targeting 2.0, 3.0, 3.5, 4.0, and 4.5 concurrently, support extension methods for both C# and VB.NET consumers?

Short Answer: You can’t. You think you can, but if you’re serious about targeting .NET 2.0/3.0 and 3.5+ as well as that whole C# and VB support thing, you can’t. Not really.

Long Answer: People love extension methods. Seriously, I think some people want to marry extension methods they love them so much. They just can’t stand to be without their extension methods, even when they’re using .NET 2.0.

Rather than go without, some people figured out how to get extension methods support on older versions of the .NET Runtime. Extension methods are essentially a compile time technology – the IL that gets emitted for calling an extension method is identical to the IL for calling a normal static method. The only runtime dependency for extension methods is the ExtensionAttribute which is used to mark methods intended to be used as extension methods (as well as classes and assemblies that contain them). ExtensionAttribute is defined in System.Core from .NET 3.5, but it’s just a marker. If you define your own copy of ExtensionAttribute and use the VS 2008 or later version of the C# compiler, you can get extension methods to work on .NET 2.0.

Back when I was working on IronPython, we ran into this exact issue when we merged DLR expression trees with LINQ expression trees. LINQ trees used extension methods all over the place, but we still needed to support .NET 2.0 in IronPython. We were already using the VS08 compiler so all we had to do was add our own copy of ExtensionAttribute to the DLR and we were good to go…or so we thought. Instead, we discovered that this approach doesn’t work as advertised – at least not if you care about VB support.

The problem stems from having multiple copies of ExtensionAttribute. IronPython and DLR had no problem – they were compiled for .NET 2.0 and thus had only the one copy of ExtensionAttribute that we added to the DLR. But people who used IronPython or DLR in a .NET 3.5 project ended up two copies of ExtensionAttribute – the copy we added to DLR and the official System.Core version. Two copies of a system provided type == start of a big problem.

Actually, if you’re only using C#, having multiple copies of ExtensionAttribute isn’t that big a deal. The C# compiler raises a warning when it find multiple definitions of a type in the System namespace. Because ExtensionAttribute is in the System namespace, C# has to pick one of the colliding type definitions to use. However, since the copies of ExtensionAttribute are identical it doesn’t matter which version the C# compiler picks.

Unfortunately, Visual Basic is much less forgiving when it encounters multiple versions of the same type. Instead of a warning like C#, the VB compiler raises an error when it encounters multiple definitions of ExtensionAttribute. So the “define your own ExtensionAttribute” approach leaves you with a DLL that won’t work from VB on .NET 3.5 or later.

Excluding VB on what was the most recent version of .NET at the time was a non starter for us, so we investigated other options. We discovered that we could “solve” this issue (again “or so we thought”) by having an internal definition of ExtensionAttribute in every assembly that needed it. Since the types weren’t public, VB stopped complaining about type collisions. C# still had the compiler warning, but we had already decided not to care about that.

I said at the time “It seems counterintuitive, doesn’t it? To solve a multiple type definition problem, we defined even more copies of the type in question.” Yeah, turns out I was kinda way wrong about that. We discovered later that having an internal ExtensionAttribute per project solved the VB ambiguous type error but introduced a new “break all the other extension methods in the project error”.

Remember earlier when I wrote it didn’t matter which copy of ExtensionAttribute the C# compiler picks because they are “identical”? Remember when I wrote we could solve the VB ambiguous type error by changing the visibility of ExtensionAttribute? Woops. Changing the visibility of our ExtensionAttribute meant it was no longer identical which meant it kinda mattered which copy of ExtensionAttribute the C# compiler choose. If the C# compiler picked one of our internal ExtensionAttributes, it would break every use of extension methods in the project referencing IronPython or the DLR!

We investigated a bunch of ways to control which version of ExtensionAttribute was selected by the C# compiler, but we couldn’t find an easy, obvious way in MSBuild to control the order of references passed to the compiler. In the end, we moved the custom ExtensionAttribute into its own DLL. That way, we could reference it from our IronPython and DLR projects to get extension method support but .NET 3.5 projects referencing either IronPython or DLR could reference System.Core instead. We still got the C# warning, but since we were back to identical ExtensionAttribute  definitions, the warning could be ignored.

Believe me, if there had been any way to remove the extension methods from the DLR and IronPython, we would have done it. Having a separate assembly with just a single custom attribute definition is an ugly hack, pure and simple. But the DLR was essentially the .NET 4.0 version System.Core – getting it to run along side the .NET 3.5 version of System.Core was bound to require hacks.

My advice to Nathanial on SO was the same as I gave at the top of this post: don’t use the “define your own ExtensionAttribute” hack to try and get extension method support on .NET 2.0. Extensions methods are nice, but they aren’t worth the headache of dealing with the errors that stem from multiple definitions of ExtensionAttribute when you try to use your library from .NET 3.5 or later.

Windows Camp Demo, Part One

Several weeks ago, I did a talk on building Windows Runtime components in C++. As part of that talk, I did a demo that showed accessing a WinRT component written in C++ from a C# XAML application. Like I did for my //build talk, I’ve written this walkthrough so you can follow along at home without having to read code off the recorded video stream. I’ve also published the source up on GitHub.

The demo had two parts – the first was a “Hello, world!” style demo, the second demonstrated wrapping an existing C++ library in a WinRT component to make it callable from other languages. This post covers the first part of the demo. I’ll post a walkthrough of the second part of the demo soon.

In order to follow along, you’ll need the Windows 8 Release Preview as well as Visual Studio 2012 Express RC for Windows 8. You should be able to use the RC version of VS 2012 Pro, Premium or Ultimate, but I’ve only tested with Express. Note, the original presentation was done on Win8 Consumer Preview / VS 11 Beta, but I figured it made more sense to write up the walkthrough on the latest bits.

We’re going to start by creating the C# XAML app we’ll use as the component client. Fire up VS 2012 RC and select new project. Select Visual C# -> Windows Metro Style -> Blank App (XAML), name the project “WindowsCamp” and press OK. Once the project has been created, open up the MainPage.xaml file, replace the Grid element that’s there by default with the following XAML code:

<StackPanel Background="{StaticResource ApplicationPageBackgroundThemeBrush}">
    <Button Click="Button_Click_1">Click me</Button>
    <TextBlock x:Name="myText" FontSize="20"></TextBlock>
    <Image x:Name="myImage"></Image>
</StackPanel>

As you can see, my UX skills have not improved since //build.

Now, we need to add a project for the C++ WinRT component. Right click on solution in the Solution Explorer and select Add -> New Project. In the New Project dialog, Select Visual C++ -> Windows Metro Style -> Windows Runtime Component, name the project “WindowsCampComponent” and press OK.

Once the component project has been created, we’re going to add some code to it. Open Class1.h if it’s not already open. Update the file to read as follows:

#pragma once

using namespace Platform;

namespace WindowsCampComponent
{
    public ref class Class1 sealed
    {
    public:
        Class1();

        String^ SayHello(String^ name) {
            return String::Concat(
                ref new String(L"Hello there "),
                name);
        };
    };
}

The code is a bit more complex than your typical Hello, world. The SayHello method takes a string parameter that represents someone’s name. The method concatenates the provided name with a hard coded greeting string and returns the resulting string. Doesn’t get much simpler. However, even though it’s just a single line of code there are several concepts that are important to point out:

  • ref class – WinRT objects are projected in C++/CX as ref classes and vise-versa. Since we’re building a WinRT component to consume from C#, we define it as a ref class. Note, unless you’re writing a XAML control, all WinRT classes must be sealed.
  • Hats – The ‘^’ character after the String type declarations is the handle-to-object modifier. It’s basically the pointer-to-object modifier (aka ‘*’) but for ref classes. We’ll see in the second part of the demo that you invoke members on a ref class using the same ‘->’ syntax that you use in vanilla C++.
  • ref new – You create instances of ref clases using “ref new” instead of “new” as you do in vanilla C++. Ref new returns a handle to the newly created ref class – a String^ in this case.
  • PlatformString – C++/CX projects some non-class WinRT types as ref classes in the Platform namespace. In this case, C++/CX projects the new language interoperable string type HSTRING as a PlatformString ref class. HSTRINGS are UTF-16, so PlatformString provides a constructor that takes a wide string literal. We imported the Platform namespace via the “using namespace” directive so we wouldn’t have to type “Platform” multiple times.

For more information about the design of the C++/CX language, check out Jim Springfield’s post on the Visual C++ team blog.

Now that we’ve written our WinRT component, we’ll write the code to consume it in C#. First, we need to add a reference to the C++ WinRT component project in our C# Metro style XAML app. WinRT references are added just like traditional CLR references – via the Add Reference dialog. Right click on the WindowsCamp node of the Solution explorer, select “Add Reference…” from the menu, click the check box next to the WindowsCampComponent project from the solution and press OK.

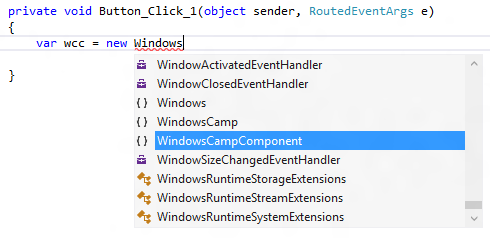
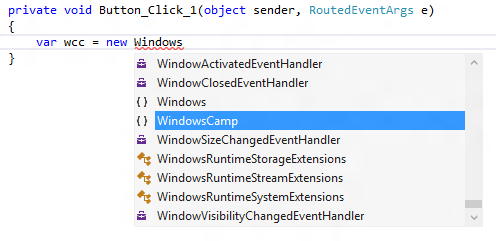
Go back to MainPage.xaml and double click on the button labeled “Click Me” in the designer. This will add a click event handler named Button_Click_1 and take you to MainPage.xaml.cs so you can write the code for it. Type in “var wcc = new Windows” and look at the resulting intellisense list. Notice that WindowsCampComponent is missing.

This is because the C++ component hasn’t been compiled yet. We need compile the C++ component project in order to generate the Windows metadata file (aka the file with the .winmd extension) that is used to drive intellisense. Delete the line of code you just added and compile the solution. Now type that line of code again, and you’ll notice that the WindowsCampComponent namespace is available.

Now, update the button click event handler to read as follows:

private void Button_Click_1(object sender, RoutedEventArgs e)
{
    var wcc = new WindowsCampComponent.Class1();
    myText.Text = wcc.SayHello("Herb Sutter");
}

Now, run the app, click the “Click Me” button and marvel at the wonder of WinRT language interop to print a greeting to Herb Sutter. I used Herb Sutter from the C++ team since he was the keynote speaker at the Windows Camp event and was standing in the back of the room when I did the demo.

And that’s it for the Hello, world demo. Kind of a lot of steps for essentially 3 lines of code – 1 line of component code and 2 lines of client code. However, we did get the infrastructure set up so we add more substantial code in the next post.

Building WinRT Components with C++/CX

I don’t get out to talk to customers like I used to in previous jobs. <sigh> But a few weeks ago, I got a chance to do a session at Channel 9′s Developing Windows 8 Metro style apps with C++ Windows Camp. There were some great talks at the event on XAML with C++, C++ for Metro Style Games and using DirectX and XAML together. My talk was on building Windows Runtime Components in C++. Here’s the abstract:

The Windows Runtime enables developers from a variety of languages – JavaScript, C#, Visual Basic and C++ – to use the Windows APIs in a natural and familiar way. But did you know that you can build your own components that project into those same languages for use in your Metro style apps? Watch this session to learn how to build your own Windows Runtime components with C++ that can be used across languages in Metro style applications.

I haven’t had time, but I plan to blog the demo step-by-step like I did for my //build demo. In the meantime, check out the talk:

(Note, the static image below appears cut-off, but the video should scale to the width of my blog automatically. If not, head on over to the official page for the talk over on Channel 9)