Blood Sweat & Code

CNN

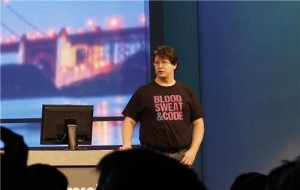
Today was a *HUGE* thrill as I got to present in the keynote at //build! I’ll have more on the specifics of Brokered WinRT Components later after my session, but apparently quite a big deal was made of my shirt. I ended up as an internet meme and on the CNN Live Blog!

A long, long time ago (back when I wrote Photoshop Plugins for Mac long before I joined Microsoft), I had a Metrowerks CodeWarrior t-shirt with the “Blood Sweat & Code” slogan on the back. I loved that slogan, but lost the shirt somewhere along the way. So a few months ago, I decided to make a new one – but this time with the purple and blue of Visual Studio’s brand instead of CodeWarrior yellow. When I got a chance to be a part of the //build keynote today, I figured it was a good wardrobe choice.

For those who want one of their own, I posted the design on Zazzle.

Build Your Own WDS Discovery Image

Given that I work on the Windows team, it shouldn’t come as a surprise that we use Windows Deployment Services to distribute Windows images internally. For most machines, it’s really convenient. You trigger a network boot (on my Lenovo, you press the “ThinkVantage” button during start up), select the image to install and what partition to install it to, wait a while, answer the installation finalization questions (machine name, user name, etc) and you’re done.

However, I have an Dell Inspiron Duo (with the cool flip screen) netbook that lacks a built in network port. No network port, no network boot. I’ve got a USB network dongle, but it doesn’t support network boot either. No network boot, no ultra-convenient WDS installation, sad DevHawk.

I was able to work around this by building a custom WDS Discover image that I loaded onto a USB flash drive. Now, I plug in the USB drive, select it as the boot device and I’m off and running…err, off and installing at any rate. Building the image was kind of tricky, so I figured it would be a good idea to write it down and share.

Step One: Install the Windows Automated Installation Kit (AIK)
The AIK is a set of tools for customizing Windows Images and deployment. In particular, it includes the Windows Preinstallation Environment (aka WinPE) which is the minimal OS environment that Windows Setup runs in. We’ll be building a custom WinPE image to launch the WDS discovery and setup from.

Step Two: Create a new PE image
The AIK includes a command line tool for creating a blank PE image. Step 1 of this walkthru shows you how to use it. It’s pretty easy. Open the Deployment Tools Command Prompt as an administrator and run the following commands:

copype.cmd x86 C:\winpe_x86
copy winpe.wim ISO\sources\boot.wim

The copype.cmd batch file creates a new PE image of the specified architecture in the specified location. The Inspiron is an Atom processor so I chose an x86 PE image.

Note, in several steps below I assume you’ve created your  PE image in c:\winpe_x86. If you’ve created it somewhere else, make sure to swap in the correct path when executing the steps below.

Step Three: Mount the PE Boot image with DISM
Now that we have our basic PE boot image, we need to update it with custom drivers and the setup experience that can load WDS images across the network. Before we can update boot.wim, we need to mount it on the file system.

The AIK includes the Deployment Image Servicing and Management (DISM) tool for working with WIM files. To mount the boot.wim file, execute the following command:

dism /Mount-WIM /WimFile:C:\winpe_x86\ISO\sources\boot.wim /index:1 /MountDir:c:\winpe_x86\mount

Copype.cmd created an empty mount directory specifically for DISM to mount WIM images in.

Step Four: Add Custom Device Driver
The driver for my USB network dongle is not included in the standard Windows driver package, so it needs to be manually added to the PE image. Again, we use DISM to do this.

dism /image:c:\winpe_x86\mount /add-driver /driver:"PATHTODRIVERDIRECTORY"

Step Five: Add Setup packages
The PE image does not include the Windows Setup program by default. There are several optional packages that you can add to your PE image. For WDS discovery, you need to add the setup and setup-client packages. Again, we use DISM to update the image.

dism /image:c:\winpe_x86\mount /add-package /packagepath:"c:\Program Files\Windows AIK\Tools\PETools\x86\WinPE_FPs\winpe-setup.cab"
dism /image:c:\winpe_x86\mount /add-package /packagepath:"c:\Program Files\Windows AIK\Tools\PETools\x86\WinPE_FPs\winpe-setup-client.cab"

Step Six: Add winpeshl.ini file
Now that we’ve added the setup program to the image, we need to tell setup to run in WDS discovery mode on startup. This is accomplished by adding a winpeshl.ini file to the WindowsSystem32 folder of the PE image.

Note, the official instructions on TechNet have a bug. The path to setup.exe should be %SYSTEMDRIVE%sources, not %SYSTEMROOT%sources. Here’s the contents of my winpeshl.ini file:

[LaunchApps]
%SYSTEMDRIVE%\sources\setup.exe, "/wds /wdsdiscover"

You can also add /wdsserver:<server> to the command line if you want to hard code the WDS Server to use in your image.

Step Seven: Add Lang.ini file
If you do all the above steps and try to boot the resulting image, you’ll get a nasty “Windows could not determine the language to use for Setup” error. Turns out there’s another bug in the official docs – you need a lang.ini file in your sources directory along side setup.exe in order to run. I just grabbed the lang.ini file off the normal Win7 boot image and copied it to the sources directory of my mounted boot image.

Step Eight: Commit and Unmount the PE Boot image
We’re now done updating the boot image, so it’s time to close and unmount it. This is accomplished with DISM:

dism /unmount-wim /mountdir:c:\winpe_x86\mount /commit

At this point, the contents of the ISO folder are ready to be transferred to a USB stick for booting.

Step Nine: Prepare the USB Flash Drive
To enable your USB flash drive to be bootable, it needs to have a single FAT32 partition spanning the entire drive. Instructions in this walkthru show you how to configure and format your USB drive.

Note, not all USB drives are created equal. I have one USB drive where the Duo just comes up with a blank screen when I try to use it for USB Boot. If you follow these steps and can’t boot, try a different USB drive.

Step Ten: Copy the image contents to the Flash Drive
I just did this with xcopy. In this case, my flash drive is E:, but obviously you should swap in the drive letter for your flash drive.

xcopy c:\winpe_x86\ISO\*.* /e e:

Step Eleven: Boot your Netbook from the USB drive
With the USB drive containing the image + the network dongle both plugged in, boot the machine and trigger USB boot. For the Duo, you can hit F12 during boot to manually select your boot source. Your custom image will be booted, and it will then look out on the network to find the WDS server to load images from. Select the image you want and where you want to install it and away you go.

One thing to remember is that you’re adding the  USB network dongle driver to the WDS discovery boot image, but not to the image that gets installed via WDS. So chances are you’ll need the driver again once you get the image installed. I put that driver on the same USB key that holds the boot image. That way I can easily install the driver once Windows is installed.
DevHawk Has A Brand New Blog (Engine)

So it would make a crappy song, but the title of this post is still true. This is my first post on the new-and-improved DevHawk running on WordPress.

I decided a while back that it was time to modernize my blog engine – DasBlog is getting a little long of tooth and there hasn’t been a new release in over two years. I spent some time looking at different options, but settled on WordPress for much the same reasons Windows Live did: “host of impressive capabilities”, scalable and widely used. Also, it’s very extensible, has about a billion available themes and has a very active development community. I was able to find plugins to replicate DasBlog’s archive page as well as archive widget that replicated custom functionality that I added to DasBlog via custom macros.

Of course, moving eight years worth of posts to a new engine took quite a bit of effort and planning. I wanted to make sure that I maintained all my posts and comments as well as take advantage of some of the new features available to me from WordPress. For example, I took the opportunity to flatten my list of categories and move most of them to be tags. I also went thru and converted all of my old code snippets to use SyntaxHighlighter instead of CodeHTMLer or Pygments for WL Writer. Of course, I automated almost all of the conversion process. For anyone interested in following my footsteps, I published my PowerShell scripts for converting DasBlog to the WordPress WXR import/export format up on BitBucket.

Not only did I want to save all my data, I also wanted to make sure I saved my search engine mojo (if I have any left after blogging a paltry six times in the past sixteen months). So I hacked up a WordPress plugin to redirect my old DasBlog links to the new WordPress URLs. That’s up on BitBucket as well for anyone who wants it. It’s got some DevHawk specific bits in there (like the category cleanup) but if you tore those parts out it would be usable for any DasBlog-to-WordPress conversion. If there’s interest, maybe I’ll write up how the conversion scripts and redirect plugin work.

The plan is that now that I’m finally done moving my blog over the new back end, I will actually start writing on a more regular basis again. We’ll see how that works out.

2009 Space Elevator Conference

Today marks the start of the 2009 Space Elevator Conference on the Microsoft campus. Last night, my father and I attended a free overview presentation on space elevators. My father is a huge sci-fi fan and has read many of Arthur C. Clarke’s books include The Fountains of Paradise so he was very excited for this opportunity. Unfortunately, while the idea of a space elevator is pretty exciting, the presentation itself left quite a bit to be desired.

For the un-initiated, a space elevator is just what it sounds like – an elevator into space. Chemical rockets are horribly inefficient, so instead the idea is to run a cable way out into space. According to Wikipedia, a space elevator would be a couple of orders of magnitude cheaper for getting things into space than chemical rocketry.

Of course, actually building a space elevator would have a massive up front cost and an engineering effort that would dwarf even the effort that landed mankind on the moon. One of the biggest problems is substance the cable itself is build out of. This cable would be thousands of kilometers long, and would have to be extremely strong. Frankly, there’s no feasible material to make the cable from available to us today. Apparently, making a cable strong enough out of the strongest high tensile steel available today would weigh more than the entire universe! Not exactly feasible. But advancements in carbon nanotubes have scientists believing they might be able to make materials 100x stronger than high tensile steel. If that pans out, it would be feasible to build the space elevator cable from carbon nanotubes.

Another big issue is power for the climbers. Current thinking apparently is to beam power to the climbers via megawatt lasers – an idea that like carbon nanotubes would have far reaching impact on our society over and above space elevators. The idea of “beaming power” sounds nearly as fantastic as the space elevator itself, but apparently there’s an X-Prize style competition underway with a cool $2 million in prize money if you can build a beam powered climber that travel 5 meters/second.

While the idea of a space elevator is very fascinating and I was excited to spend an evening with my dad geeking out in a non-software related field, the presentation itself was kinda crappy. I have no doubt that Dr. Bryan Laubscher, who delivered the presentation, is one of the top minds in space elevator theory and technology in the world today. However, his presentation was bullet-point laden, rambling, incoherent at times and frankly boring.

For example, I get the feeling that Dr. Laubscher spends a lot of time defending the idea of a space elevator to skeptical NASA scientists. He spent WAY too much time talking about how inefficient chemical rockets are – I mean, mention it once but don’t keep coming back to that point over and over. He also went off on a strange tangent about the potential for societal decline when we turn our back on exploration. But he wasn’t presenting to skeptical NASA scientist last night – he was presenting to group of enthusiastic amateurs. If you can’t tailor your presentation to your audience, there’s no way you’re going to be effective.

While the presentation could have been better, it still had some fascinating information. For example, there would probably have to be multiple space elevators – Dr. Laubscher estimated there would be five. It’s much more efficient to have the space elevator be one way so you need at least two – one to have one to go up and one to go down. I never considered the idea of multiple space elevators before.

Apparently, last year’s Space Elevator Conference was on the Microsoft Campus and I wouldn’t be surprised if next year’s was as well. I hope it will be. I’d like to attend more of the conference. Saturday is Space Elevator 101 day at the conference but I’m driving my parents to the airport. In the meantime, there are some space elevator blogs to follow. Also, I met the president of the LiftPort Group which is headquartered in Seattle, so maybe I’ll get a chance to talk to him one-on-one sometime after the conference is over.

And I should probably read The Fountains of Paradise while I’m at it.

Strengthening the Microsoft Ecosystem with Source Code

clip_image001

Today was the Presentation Idol competition I blogged about a couple of weeks ago. Unfortunately, I didn’t win – but believe me when I say I was up against some serious competition. I think I was about in the middle of the pack – better than some but clearly not as good as others.

Since I made a big deal about asking for people ideas on how to present my topic of choice – external contributions to Microsoft Open Source projects – I decided I’d post my deck and my script. Yes, I said script. Usually, I don’t script what I’m going to say word for word like this. But with only three and a half minutes to present, I thought I’d be as precise as possible. You’ll notice some lines near the end are in italics – those are ones I planned on cutting if I was in danger of going over the time limit.

Feedback, as usual, is most welcome.


Slide1

Hello, my name is Harry Pierson. I’m a program manager in the Visual Studio Languages group and I’m here to talk about what I would most like to do to improve Microsoft.

At Microsoft, we care an awful lot about the software ecosystem. Searching for the word “ecosystem” on Microsoft.com returns nearly eight thousand results. We talk about the ecosystem in our marketing and in our press releases.

Slide2

In 2007, we commissioned a study of the global economic impact of the Microsoft ecosystem. In a word, it’s massive. It’s responsible for nearly 15 million jobs and drives over half a trillion dollars a year in tax revenue worldwide.

No wonder we care about the ecosystem so much.

Slide3

But clearly, we’re not the only ones who care. Microsoft represents a fairly small percentage of the overall ecosystem. We earn just over 11% of the total revenue and account for half of one percent of the total employment within the ecosystem.

That means there are an awfully large number of people with a vested interest in the continuing success of the Microsoft platform.

Slide4

With this vast ecosystem in mind, I want to talk about Open Source. Microsoft and Open Source are often portrayed as enemies. But in DevDiv, we have several high profile Open Source projects. I work on IronPython, which has been Open Source for over four years. More recently, the ASP.NET and Extensibility Framework teams have decided to release some projects as Open Source.

I believe we should have more Open Source projects at Microsoft. But more importantly, I feel that we need to go beyond the textbook definition of Open Source. Our Open Source projects are typically closed to external contributions. But for the ecosystem at large, Open Source isn’t just about the availability and distribution terms of the source code. It also implies a collaborative development model - parties working together across organizational boundaries, contributing directly to projects in question.

The thing I would most like to change about Microsoft would be to let members of our ecosystem contribute code to our Open Source projects.

Slide5

I can tell you from personal experience, there are members of the IronPython community who would leap at the opportunity to contribute code. And their engineering prowess and real world would benefit the IronPython project tremendously. But the legal process for getting permission to take contributions is onerous. Worse, the legal stigma attached to code that isn’t 100% pure Microsoft intellectual property makes it nearly impossible for any other group inside Microsoft to build on it.

I realize the onerous legal process is there for a reason: to protect Microsoft’s interests. But improving IronPython and Open Source projects like it isn’t just in Microsoft’s best interest; it’s in the best interest of our ecosystem as well. We need a legal framework that protects Microsoft while allowing for code contributions. Developing such a framework will be a challenge. But competitors like Sun, Google and IBM have already demonstrated that it’s not insurmountable.

Slide6

Half a trillion dollars annually. 15 Million jobs. 42% of the IT workforce. The Microsoft ecosystem is the envy of the industry. And Microsoft is in a unique position to harness the collective experience and engineering prowess of that ecosystem while simultaneously dispelling the myth that we are an enemy of Open Source.

It’s time we make this change.

Thank you very much.